Installation instructions
Note that our plugin will NOT work with New Outlook for Windows. Please use the web version of the plugin instead. Also, remember that the plugin will only work with Microsoft powered email (so gmail addresses will not work with the plugin).
1. Determine your Outlook bit version:
-
Outlook 2013/2016: File > Office Account > About Outlook (listed at the end of the first line on the pop-up)
-
Outlook 2010: File > Help (listed on the first line below, “About Outlook”)
2. Download and run the correct version of the plugin using one of the buttons below:
-
Close Outlook
-
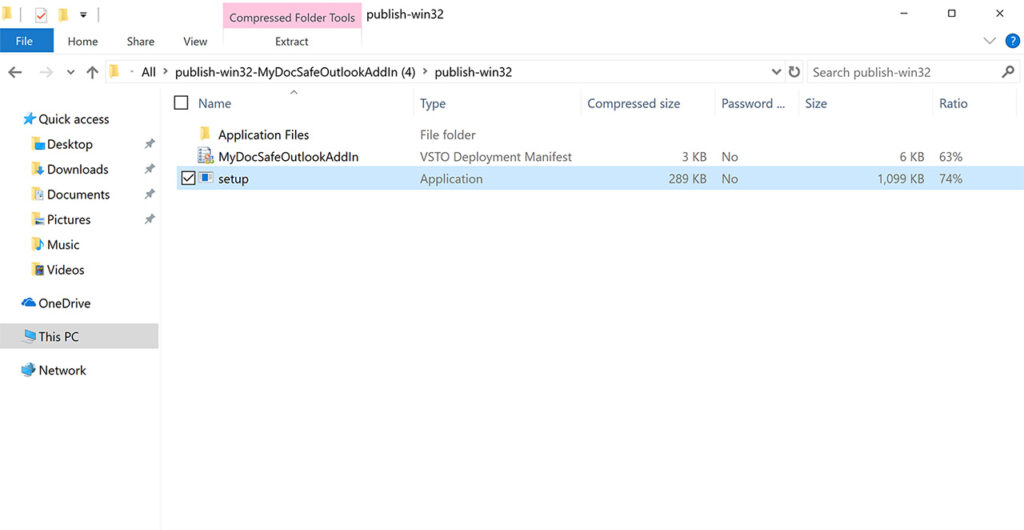
Download the correct plugin and double click on its main folder
-
Run Setup.exe
Download 32 bit
Download 64 bit

3. Connect the plugin with your MyDocSafe account
-
Open Outlook
-
Click ‘New Email’
-
Compose an email with an attachment
-
Click MyDocSafe logo. A new window will open asking you to provide login information to MyDocSafe. Follow the instructions. When you see ‘0Auth2 access is granted’ message the connection is established and you can close the browser window.
4. Tell us in which portal group you want MyDocSafe to publish documents and file signed documents
-
Open MyDocSafe -> Company Settings -> Integrations -> Outlook -> choose a Portal Group and default folders (if you do not have any, you should first create a Portal Group and Default Folders).
-
Click ‘Save’
Final notes
-
Ignore the ‘Access Token’ field – it is not required for Microsoft Outlook
New Installation
You may also find the Plugins icon in Tools:
-
Click on the ‘Get Add-ins” button. If you can’t see that button that is probably because you are not using a corporate email account with your Outlook. You need to link your Outlook to a corporate email account first.
2. Go to “My add-ins”, then Custom add-ins and Add an addin from File and use the plugin file previous downloaded from our website.
(if Add an adding from URL is enabled, use these instructions:
3. Install the plugin
4. Generate the Access token and save it in the plugin. To generate the token login to MyDocSafe, go to Company Settings -> Integrations -> Outlook and click on ‘Generate Token’. Copy the token. Then paste it in the ‘Access Token’ field in the Outlook plugin and click save.
New Installation
-
Login to Outlook through one of the browsers we support (Chrome, Firefox, Safari, the latest Edge)
2. Click on “+ New Message” button and then press “…” button which you will find below the message box. Then select “Get Add-ins”:
If ‘add from URL’ option is not available, choose ‘add from file’ instead and use the plugin file downloaded from our website.
4. Install the plugin
5. To find MyDocSafe in your Outlook, click on “+ New Message” button, then press the “…” icon below the message box. You will see MyDocSafe as one of the options.
6. Generate the Access token and save it in the plugin. To generate the token login to MyDocSafe, go to Company Settings -> Integrations -> Outlook and click on ‘Generate Token’. Copy the token. Then paste it in the ‘Access Token’ field in the Outlook plugin and click save.
New installation instructions
1. Determine your Outlook bit version:
-
Outlook 2013/2016: File > Office Account > About Outlook (listed at the end of the first line on the pop-up)
-
Outlook 2010: File > Help (listed on the first line below, “About Outlook”)
2. Download and run the correct version of the plugin using one of the buttons below:
-
Close Outlook
-
Download the correct plugin and double-click on its main folder
-
Run Setup.exe
Download 32 bit
Download 64 bit
3. Connect the plugin with your MyDocSafe account
-
Open Outlook
-
Click ‘New Email’
-
Compose an email with an attachment
-
Click MyDocSafe logo. A new window will open asking you to provide login information to MyDocSafe. Follow the instructions. When you see ‘0Auth2 access is granted’ message the connection is established and you can close the browser window.
4. Tell us in which portal group you want MyDocSafe to publish documents and file signed documents
-
Open MyDocSafe -> Company Settings -> Integrations -> Outlook -> choose a Portal Group and default folders (if you do not have any, you should first create a Portal Group and Default Folders).
-
Click ‘Save’
Final notes
-
Ignore the ‘Access Token’ field – it is not required for Microsoft Outlook
Our Microsoft Partner Marketplace listing is here.
